
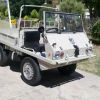
It looks nice and shiny! Too clean to take into the woods!
Why haven't the rear foot wells been painted? Still have tin worm in them? Maybe I should buy it a Christmas present of a bottle of polish! I can just see you polishing the underneath of the platform.....
John
Body off restoration starts today!
Re: Body off restoration starts today!
Haflinger 703AP LWB 1973 - (Once owned by Lady Sutherland & Sons.) Now called "Lurch" !
Have you hit the "DONATE" button at the bottom of the page after reading this post? Many thanks if you have!!
Have you hit the "DONATE" button at the bottom of the page after reading this post? Many thanks if you have!!

Re: Body off restoration starts today!
John, yes there was some rot in the rear footwells, but that has been repaired (rot cut out, new metal plates set in and welded, and then some filler applied to make things smooth & even). Not quite sure why he did things in the order he has done, but it'll all be alright when done!
Julian B
W Sussex, UK
| '62 Early Series I SWB | '72 Series II LWB |
| '56 Citroën Traction Avant |
W Sussex, UK
| '62 Early Series I SWB | '72 Series II LWB |
| '56 Citroën Traction Avant |
-
pathfinder700ap
- Posts: 201
- Joined: Sun Dec 30, 2012 4:38 pm
- Location: Graz, Austria
Re: Body off restoration starts today!
Julian,
the finish looks superb in the pictures, congratulations! I am sure it will be fun to re-assemble all the bits and pieces to the platform and it will soon look like a Haflinger again!
Kind regards,
Constantin
the finish looks superb in the pictures, congratulations! I am sure it will be fun to re-assemble all the bits and pieces to the platform and it will soon look like a Haflinger again!
Kind regards,
Constantin
Re: Body off restoration starts today!
Collected the Haflinger body from the paint shop yesterday; I'm very pleased with the result, even though it is not "perfect". But I had to draw the line somewhere, and it is 98% as good as I had hoped it would be. Beginning to regret ever dismantling the hinges though, as I'm still not sure quite how to re-do them. For now the first step is to create and install a new wiring loom which I started to do today. The main "backbone" section of the loom is done, but I'm getting a bit tangled up in knots with the front section! Loads to do over the next couple of weeks, so hope I'm not expected to do much in the house this side of New Year 
- Attachments
-
-
-
Julian B
W Sussex, UK
| '62 Early Series I SWB | '72 Series II LWB |
| '56 Citroën Traction Avant |
W Sussex, UK
| '62 Early Series I SWB | '72 Series II LWB |
| '56 Citroën Traction Avant |
Re: Body off restoration starts today!
Julian,
For what it's worth, the hinges can be done at a later date if need be. In the meantime you can just use some brass tubing of the correct diameter. Cut to length, then a length of brass studding put up the centre of the tubing, with nuts on either end. A quick tap with the Ball Pein hammer to turn the ends over and stop the nuts undoing.
The rest of it is looking good.
The wiring harness should not be too difficult if you take your time and run one wire to the correct place and then label it. Getting ALL the wires up the tunnel on the floor of the cab might present a challenge! I would do it by putting some plastic sleeving do the tube with some thin string down it already. Tie one or two of the wires tot he string and then pull the sting through. Start with the ball of string on the floor under the platform, pull it and the few wires through, making sure you still have the string running through the tunnel when you have got your wires into the cab. That way you have the string ready to tie on to the next couple of wires!
I doubt you would be able to pull ALL the wires you need through in one go, but that would obviously be the most useful.
John
Haflinger 703AP LWB 1973 - (Once owned by Lady Sutherland & Sons.) Now called "Lurch" !
Have you hit the "DONATE" button at the bottom of the page after reading this post? Many thanks if you have!!
Have you hit the "DONATE" button at the bottom of the page after reading this post? Many thanks if you have!!
Re: Body off restoration starts today!
I have done the difficult bit with the loom, John - with all of the relevant wires in a plastic sleeve, I pushed a length of welding wire down through the channel, bound it to the leading wire with insulating tape and pulled the loom up and through. Have to say it was much easier than anticipated!
Julian B
W Sussex, UK
| '62 Early Series I SWB | '72 Series II LWB |
| '56 Citroën Traction Avant |
W Sussex, UK
| '62 Early Series I SWB | '72 Series II LWB |
| '56 Citroën Traction Avant |
Re: Body off restoration starts today!
Julian,
You missed your Christmas deadline... ... Although if you are on the reassembly of the Speedometer that suggests most of your Haflinger is back together again!
John
You missed your Christmas deadline...
John
Haflinger 703AP LWB 1973 - (Once owned by Lady Sutherland & Sons.) Now called "Lurch" !
Have you hit the "DONATE" button at the bottom of the page after reading this post? Many thanks if you have!!
Have you hit the "DONATE" button at the bottom of the page after reading this post? Many thanks if you have!!
Re: Body off restoration starts today!
I'll admit that I did miss my initial estimate of being finished by Christmas, but I'm having such fun doing it that all is not lost!
At the moment I have the chassis / running gear pretty much done - except for the brakes - but there is a small oil leak in the OSR hub, so I'll need to re-do that. The body is now back with me and I am currently working on that. I'm coming to the end of creating and installing a new wiring loom (made by me from scratch), and hope to start testing things in the next couple of days. The dashboard was put back in today, but thanks to a technical c*ck up on my part the two ~25mm "nuts" that hold the key and the starter button onto the dashboard are now u/s ... I had sent them off to be re-anodised but they must have been alloy as they have are now disintegrating in front of my eyes
 . I'll need to try to locate replacements. The speedo could do with some attention too! One of the headlight reflectors has lost much of its internal chroming, so I will need to repair (more likely replace) it. I have had some new seat covers made up - they look superb.
I need to tip the body on to its side soon, so that I can fit and set up the throttle linkages etc, and then I will be almost ready to put the body back on to the chassis. No idea when this will be, but it ought to be within a week or three.
The painter has virtually done everything - all he now has is the three sideboards, the roof "hoops" and (frustratingly) the long thin throttle linkage bar.
But above all, I'm loving doing the work - and learning lots during the process.
At the moment I have the chassis / running gear pretty much done - except for the brakes - but there is a small oil leak in the OSR hub, so I'll need to re-do that. The body is now back with me and I am currently working on that. I'm coming to the end of creating and installing a new wiring loom (made by me from scratch), and hope to start testing things in the next couple of days. The dashboard was put back in today, but thanks to a technical c*ck up on my part the two ~25mm "nuts" that hold the key and the starter button onto the dashboard are now u/s ... I had sent them off to be re-anodised but they must have been alloy as they have are now disintegrating in front of my eyes
I need to tip the body on to its side soon, so that I can fit and set up the throttle linkages etc, and then I will be almost ready to put the body back on to the chassis. No idea when this will be, but it ought to be within a week or three.
The painter has virtually done everything - all he now has is the three sideboards, the roof "hoops" and (frustratingly) the long thin throttle linkage bar.
But above all, I'm loving doing the work - and learning lots during the process.
Julian B
W Sussex, UK
| '62 Early Series I SWB | '72 Series II LWB |
| '56 Citroën Traction Avant |
W Sussex, UK
| '62 Early Series I SWB | '72 Series II LWB |
| '56 Citroën Traction Avant |
Re: Body off restoration starts today!
Where and how much did your seat covers cost, I am sure there is a market for them - me for one!
Finding replacement nuts for the starter and the key should not be impossible, there are a couple of places in Brighton that might have such things. The Nut & Bolt Store on Portland Road and Speedy Spares on the A27 towards Worthing.
Other than the obvious Google search of course.
Head light reflector can't be polished by hand, not unless you want patches with no silver on them! I have tried several time and no mater how lightly you think you are being, it still comes off.
There are places which offer re-silvering for reflectors and you can even get them coated with glass so they are like a mirror, which will allow you to wipe them clean when you want. The only down side is you lose a little of the brightness in the reflected light because of the glass.
John
Haflinger 703AP LWB 1973 - (Once owned by Lady Sutherland & Sons.) Now called "Lurch" !
Have you hit the "DONATE" button at the bottom of the page after reading this post? Many thanks if you have!!
Have you hit the "DONATE" button at the bottom of the page after reading this post? Many thanks if you have!!
Re: Body off restoration starts today!
Julian,
If you are sure they are 25mm then possibly these:-
http://uk.rs-online.com/web/p/cable-gla ... s/4711401/
Not sure if the thread pitch is correct, but they might stock variations.
John
If you are sure they are 25mm then possibly these:-
http://uk.rs-online.com/web/p/cable-gla ... s/4711401/
Not sure if the thread pitch is correct, but they might stock variations.
John
Haflinger 703AP LWB 1973 - (Once owned by Lady Sutherland & Sons.) Now called "Lurch" !
Have you hit the "DONATE" button at the bottom of the page after reading this post? Many thanks if you have!!
Have you hit the "DONATE" button at the bottom of the page after reading this post? Many thanks if you have!!
Re: Body off restoration starts today!
John, to answer your first question, I had them made by The Trimming Centre in Hove. I took my old ones in, they unstitched some to make patterns and re-used all of the cushion "stuffings". Whilst I have yet to use them for real, they certainly look superb. They even stitched some matching fabric around the front seat chains, so they look really nice too.heinkeljb wrote:Where and how much did your seat covers cost, I am sure there is a market for them - me for one!
The answer to your second question will fall within the "you don't want to know" category! Horribly expensive, but heck, I'm only getting older
I know the Nut & Bolt Store well - a fabulous emporium isn't it!
Julian B
W Sussex, UK
| '62 Early Series I SWB | '72 Series II LWB |
| '56 Citroën Traction Avant |
W Sussex, UK
| '62 Early Series I SWB | '72 Series II LWB |
| '56 Citroën Traction Avant |
Re: Body off restoration starts today!
I'm making reasonable progress with the restoration; most of the hinges are now done, the electrics & dash in and working, & the four seats are completed. When I have finished with the underside I will put it back on the floor and attach the steering column & associated controls. And then the body will be almost ready to go back on to the chassis
I've raised the body off the floor today as there are some bits of the underside that could do with a bit more paint (where the spray gun missed). Having this garage lift does make life easy .
.
I've raised the body off the floor today as there are some bits of the underside that could do with a bit more paint (where the spray gun missed). Having this garage lift does make life easy
- Attachments
-
Julian B
W Sussex, UK
| '62 Early Series I SWB | '72 Series II LWB |
| '56 Citroën Traction Avant |
W Sussex, UK
| '62 Early Series I SWB | '72 Series II LWB |
| '56 Citroën Traction Avant |
Re: Body off restoration starts today!
Julian,
Talk about shutting the barn door after the horse has bolted.
(I'll explain when I see you next)
Other than that, It's all looking good, but test driving it will have to wait for the good weather unless you want to clean it all over again!
John
Talk about shutting the barn door after the horse has bolted.
(I'll explain when I see you next)
Other than that, It's all looking good, but test driving it will have to wait for the good weather unless you want to clean it all over again!
John
Haflinger 703AP LWB 1973 - (Once owned by Lady Sutherland & Sons.) Now called "Lurch" !
Have you hit the "DONATE" button at the bottom of the page after reading this post? Many thanks if you have!!
Have you hit the "DONATE" button at the bottom of the page after reading this post? Many thanks if you have!!
-
AustHaflinger
- Posts: 2472
- Joined: Sun Jan 06, 2013 1:27 am
- Location: Canberra Australia
Re: Body off restoration starts today!
Oh comeon John - you can tell us tooheinkeljb wrote:Talk about shutting the barn door after the horse has bolted.
(I'll explain when I see you next)
We wont tell anyone
Haflinger 700AP (73)
Range Rover Sport TDV6 (07)
Landrover FC 101 (77)
Landrover Series 1 SWB Station Wagon (57)
Landrover Series 1 SWB (57)
Jaguar E-type Roadster V12 (71)
Jaguar XJ12C (76)
Range Rover Sport TDV6 (07)
Landrover FC 101 (77)
Landrover Series 1 SWB Station Wagon (57)
Landrover Series 1 SWB (57)
Jaguar E-type Roadster V12 (71)
Jaguar XJ12C (76)
Re: Body off restoration starts today!
Made pretty good progress today, with the help of a good friend. In less than 9 hours we:
I also need to get the NSR corner sorted as I am ashamed to admit that I damaged the right hand end of the rear cross member on the car hoist. Will need to have it bashed out and re-painted 
- reattached the body to the chassis
connected all control rods & cables & brakes
connected steering arms etc
removed the rear hubs (as they were leaking), replaced x2 seals & split pins and put the hubs back on
installed the engine to the chassis, but no connections made
installed the exhaust silencer
I also need to get the NSR corner sorted as I am ashamed to admit that I damaged the right hand end of the rear cross member on the car hoist. Will need to have it bashed out and re-painted
Julian B
W Sussex, UK
| '62 Early Series I SWB | '72 Series II LWB |
| '56 Citroën Traction Avant |
W Sussex, UK
| '62 Early Series I SWB | '72 Series II LWB |
| '56 Citroën Traction Avant |
Re: Body off restoration starts today!
What a shame!!
Lets hope it straightens out nicely and that the painting can be done so it is not noticeable that a repair had to be done!
What did you do? Drop the Lift on it?
John
Lets hope it straightens out nicely and that the painting can be done so it is not noticeable that a repair had to be done!
What did you do? Drop the Lift on it?
John
Haflinger 703AP LWB 1973 - (Once owned by Lady Sutherland & Sons.) Now called "Lurch" !
Have you hit the "DONATE" button at the bottom of the page after reading this post? Many thanks if you have!!
Have you hit the "DONATE" button at the bottom of the page after reading this post? Many thanks if you have!!
Re: Body off restoration starts today!
I made good progress today, but as ever still more to do. It is often a case of two steps forward one step back!
The engine is now in and running smoothly, but it wasn't easy to get all of the throttle linkages lined up and adjusted properly. In the end we had to put a slight bend in one of the connecting rods. The brakes are now in and bled, and the handbrake set; but will need to wait until the Haflinger is more mobile before I can check their efficacy.
The clutch also needs adjusting, and I have yet to be able to select reverse gear properly - something is not quite right!
Very glad I checked the air intake box before I attached it to the carb - a mouse had taken up residence on the engine side of the air filter and it was full of bedding & empty acorn shells etc. Had I not seen that the whole lot would have been sucked into the engine
Still no time table set for completion, but it shouldn't be too long now - exciting!
Julian B
W Sussex, UK
| '62 Early Series I SWB | '72 Series II LWB |
| '56 Citroën Traction Avant |
W Sussex, UK
| '62 Early Series I SWB | '72 Series II LWB |
| '56 Citroën Traction Avant |
-
pathfinder700ap
- Posts: 201
- Joined: Sun Dec 30, 2012 4:38 pm
- Location: Graz, Austria
Re: Body off restoration starts today!
Julian,
re the reverse gear, I think that with your early gear stick, connecting rods etc. the whole assembly is not designed to have proper adjustment positions (i.e. the rotatable flange between gearbox mechanism and the long connecting rod on younger Hafs). A friend in Germany, I think, used the gear lever mounting point itself to make an adjustment. Because the early gear levers don't have the aluminium housing with countersunk screws at the bottom, it is possible to slightly rotate the whole assembly by untightening the four screws. I actually don't know if it really works, but it might be worth a try.
Kind regards,
Constantin
Re: Body off restoration starts today!
Thanks Constantin - I will try that method when I try to get it to work next week!
Julian
Julian
Julian B
W Sussex, UK
| '62 Early Series I SWB | '72 Series II LWB |
| '56 Citroën Traction Avant |
W Sussex, UK
| '62 Early Series I SWB | '72 Series II LWB |
| '56 Citroën Traction Avant |
Re: Body off restoration starts today!
Just to say that after a lot of pains and tribulations today we managed to get the gear selector to work properly, and (it would seem) the gearstick won't "pop out" of gear. Possibly not one cause of the problems, but by
Next task is getting the brakes sorted ...
- tightening the nut that connects the rear of the gearstick shaft to the finger that comes out of the gearbox tower,
moving the gearstick plates in the cabin to one side (as per Constantin's suggestion above), and
slightly adjusting the clutch cable
Next task is getting the brakes sorted ...
Julian B
W Sussex, UK
| '62 Early Series I SWB | '72 Series II LWB |
| '56 Citroën Traction Avant |
W Sussex, UK
| '62 Early Series I SWB | '72 Series II LWB |
| '56 Citroën Traction Avant |