
Glen,
Doesn't your Haf have a fuel gauge? Or at worst a "low level" fuel light? Both things are possible to "retro fit" if they are of interest to you. Admitedly, the fuel gaugeon Lurch can sometimes swing from empty to full in less than a second, but generally if driving down a smooth road, it is stable enough to give you a good idea of how much fuel you have left in the tank and when you should be looking for a petrol station.
Be careful how you leave your Diff lock leavers to dry after using the Plastidip, the drying "drip" might end up in an unwanted position! I suppose if you could leave it to drip for a while until it was on it's last drip. Then put it in a drill on a slow speed so it turns round and round and the Plastidip will even out.
John
Hemi the Haff.
Re: Hemi the Haff.
Haflinger 703AP LWB 1973 - (Once owned by Lady Sutherland & Sons.) Now called "Lurch" !
Have you hit the "DONATE" button at the bottom of the page after reading this post? Many thanks if you have!!
Have you hit the "DONATE" button at the bottom of the page after reading this post? Many thanks if you have!!
-
AustHaflinger
- Posts: 2472
- Joined: Sun Jan 06, 2013 1:27 am
- Location: Canberra Australia
Re: Hemi the Haff.
Well you are certainly making progress there which is good to see  . Re the banjo bolt you will need to source another one as sooner or later it will start leaking or pop out. If you have no luck at the usual haf suppliers - try a diesel injection tuning shop as older diesels run these on their unjection systems - there is a good chance you will find one that fits.
Nice inventiveness on the fuel dip stick - I just put in a VDO fuel gauge which works great in conjunction with the low fuel light.
Keep up the great work
Garry
Nice inventiveness on the fuel dip stick - I just put in a VDO fuel gauge which works great in conjunction with the low fuel light.
Keep up the great work
Garry
Haflinger 700AP (73)
Range Rover Sport TDV6 (07)
Landrover FC 101 (77)
Landrover Series 1 SWB Station Wagon (57)
Landrover Series 1 SWB (57)
Jaguar E-type Roadster V12 (71)
Jaguar XJ12C (76)
Range Rover Sport TDV6 (07)
Landrover FC 101 (77)
Landrover Series 1 SWB Station Wagon (57)
Landrover Series 1 SWB (57)
Jaguar E-type Roadster V12 (71)
Jaguar XJ12C (76)
Re: front bash plate
Morning chaps, 1st sunny Saturday day here in south wales in ages - you know the rule .. suns out grinders out 
Id like to patch up the mounting holes, does anyone have a photo of the front edge.?
Im also going to have to make/buy the roof-to rollbar pieces at some point.
As well as get some seals to fix the leaky rear hub, as although Hemi ain't fast id still like to stop with having to book it in advance.
Cheers

Id like to patch up the mounting holes, does anyone have a photo of the front edge.?
As well as get some seals to fix the leaky rear hub, as although Hemi ain't fast id still like to stop with having to book it in advance.
Cheers


Re: Hemi the Haff.
Does this show enough detail?
Julian B
W Sussex, UK
| '62 Early Series I SWB | '72 Series II LWB |
| '56 Citroën Traction Avant |
W Sussex, UK
| '62 Early Series I SWB | '72 Series II LWB |
| '56 Citroën Traction Avant |
Re: Hemi the Haff.
Hi Julian, yes perfect thanks, I just needed to see if the rib extended to the edge.
Re: Hemi the Haff.
The ribs on the front Diff Guard match up with the ribs on the front floor so just flat over laps. Holes should be 8mm. Another of the strange Haflinger design issues. If you put a bolt through from the inside, you need another pair of hands to keep a spanner on it whilst you put the nut and washer on the bottom and tighten. Same if you do it the other way round and put he bolt from the inside outwards. Would have made more sense to put a captive nut on the inside of the floor, then you could just put the bolt in from the bottom with out any issue. Also bolt head is smaller than a nut and bit of thread if you end up sliding that part of the Haf along te ground whilst off road.
John
John
Haflinger 703AP LWB 1973 - (Once owned by Lady Sutherland & Sons.) Now called "Lurch" !
Have you hit the "DONATE" button at the bottom of the page after reading this post? Many thanks if you have!!
Have you hit the "DONATE" button at the bottom of the page after reading this post? Many thanks if you have!!
Re: Hemi the Haff.
I've had a bit of a spurt with Hemi recently some were easy and satisfying to get done, others were along the lines of WTF was the designer thinking..!
It was a simple job to replace the hub oil seal wheel off 5 bolts and a split pin - easy and hopefully the oily brakes are history.
Something that I've been meaning to do is make a couple of guard's to enclose the clutch master, I borrowed a pair - thanks Marc. !
Drew up the pattern on cad and got my son to burn them out on the laser. perfect fit ready for paint.
I've also refurbished the diff lock levers using plastidip - good shout John. the only issue is the tins were a bit small the get the handle in fully, pics to follow.
However refitting the levers brings me to the apex of frustration, the damn rubber bushes and the metal caps, the designer needs a good kicking what the hell is wrong with a lift and hook engage/disengage ?
Now looking at the design of the caps they look like they should drop over the bush and twist to lock the pins into the slots, however I don't have the tool .. Is there a tool?
So I resorted to trying to push the pins in and push the cap down. WTF.. I bet it was the same idiot designer what's wrong with a twist lock.?
tomorrow I'll look at making a crowsfoot style tool to fit over the cap and allow it to be turned with a wrench
Please tell me I'm missing a simple trick to get these caps easily seated.
cheers..
It was a simple job to replace the hub oil seal wheel off 5 bolts and a split pin - easy and hopefully the oily brakes are history.
Something that I've been meaning to do is make a couple of guard's to enclose the clutch master, I borrowed a pair - thanks Marc. !
Drew up the pattern on cad and got my son to burn them out on the laser. perfect fit ready for paint.
However refitting the levers brings me to the apex of frustration, the damn rubber bushes and the metal caps, the designer needs a good kicking what the hell is wrong with a lift and hook engage/disengage ?
Now looking at the design of the caps they look like they should drop over the bush and twist to lock the pins into the slots, however I don't have the tool .. Is there a tool?
So I resorted to trying to push the pins in and push the cap down. WTF.. I bet it was the same idiot designer what's wrong with a twist lock.?
tomorrow I'll look at making a crowsfoot style tool to fit over the cap and allow it to be turned with a wrench
Please tell me I'm missing a simple trick to get these caps easily seated.
cheers..
Last edited by gren_t on Tue May 02, 2023 10:08 am, edited 1 time in total.
Re: Hemi the Haff.
Nope! Everybody struggles with them. Rubber and a bump on the shaft to hold them engaged.... As you say, they are done that way "just because we can"!
Did you replace the ring the seal runs on in the front hubs when you replaced the seals? If not, then expect them to start leaking again after some use. You might be lucky and they will seal, but usually they haven't been changed in a while and there is a ridge on the ring which wears the new seal. If you want to visit that area again, there is "ring" which the seal runs on and you have to look very carefully to see it is not just part of the front hub shaft. The "trick" to dealing with it, is to heat the "ring", the rubber "O" ring which is inside will expand and "Pop" the "ring" away from the flange of the front hub. New ring with new "O" ring, slide it on, use a piece of tubing the right size and length and tap it up snug.
John
Haflinger 703AP LWB 1973 - (Once owned by Lady Sutherland & Sons.) Now called "Lurch" !
Have you hit the "DONATE" button at the bottom of the page after reading this post? Many thanks if you have!!
Have you hit the "DONATE" button at the bottom of the page after reading this post? Many thanks if you have!!
Re: Hemi the Haff.
Hi John, thanks for the reply, good to know I'm not missing something, I have got to do battle again with the front lever retaining cap tonight.
The leaking seal was the n/s rear, the seal surface on the hub was in really good condition no wear at all, I did give it a once over with wire wool before cleaning and oiling prior to refitting to get rid of some staining.
thanks for the tip I'll remember that.
Gren
The leaking seal was the n/s rear, the seal surface on the hub was in really good condition no wear at all, I did give it a once over with wire wool before cleaning and oiling prior to refitting to get rid of some staining.
thanks for the tip I'll remember that.
Gren
Re: Hemi the Haff.
Hi All, It's been a while since i've had the chance to do anything on Hemi due to a new job, however I did try tarting up the difflock levers using plasidip and all in I'm happy with the result, a larger container would have made it easier to dip them though as they had to be angled in to the tin.
after a few trips to the tip - it's Hemi's main job at them moment I noticed there was a drip from the bellhousing, so I cut down a wing nut to fit into the the bellhousing drain hole so I could see exactly how bad the leak was after a fixed mileage.
After 15 miles I drained it into a small pot
Oh dear far more than I expected I even spilt most of it as I expected a small dribble, so engine out to check the source of the leak it smelt like EP90
well I've cleaned up the bellhousing and ordered an engine seal kit and a seal for the gearbox input shaft.
I'll be introducing the tinware to a series of hammers and while the engine is out I've cleared the copious amounts of cobnut shells and old oil from the cylinder fins.
More to come when I get into the engine.
cheers.
After 15 miles I drained it into a small pot
Oh dear far more than I expected I even spilt most of it as I expected a small dribble, so engine out to check the source of the leak it smelt like EP90
I'll be introducing the tinware to a series of hammers and while the engine is out I've cleared the copious amounts of cobnut shells and old oil from the cylinder fins.
More to come when I get into the engine.
cheers.
Re: Hemi the Haff.
Certainly looks like a leak from the gear box input shaft. Could you tell by the fact tht you would have to put more oil into the Diff in order to get it back up to the level of the filler hole? In theory at least, the amount you took out of the Bell housing would match the amount you would have to put back into the Diff / Gearbox if the leak was on that side of the Bell housing. If it were engine Oil then the same would be true for filling up engine oil.
Make sure you check the Clutch plate for oil contamination as it would not be nice to put it all back together again and then find you have clutch slip!
Check the Clutch release bearing as well - altough not as bad a job to take the engine out on a Haflinger, it is still a pain if you have only just done it!!
John
Haflinger 703AP LWB 1973 - (Once owned by Lady Sutherland & Sons.) Now called "Lurch" !
Have you hit the "DONATE" button at the bottom of the page after reading this post? Many thanks if you have!!
Have you hit the "DONATE" button at the bottom of the page after reading this post? Many thanks if you have!!
Re: Hemi the Haff.
Hi john,
Yeah clutch is good no contamination and the pressure plate is clean and shiny no marks or blueing.
The thrust bearing was a little rough but it majically got much better when i found out how much they are.
Lol i did clean it up and sluice it - its good now and will be replaced when i pull the platform to start a restore in the winter.
Im running around in it and fixing little stuff so i know what need doing during the rebuild - eg the gearbox crunches 4th to 3rd and gear selection is a little sloppy so im looking at refurbishing the gearbox as a start.
Cheers all
Re: Hemi the Haff.
Does anyone have tips for getting the oil drain tubes back onto the 2 studs on the rocker cover ?
Doh… overthinking remove rocker cover and then fit pipe
Doh… overthinking remove rocker cover and then fit pipe
Re: Hemi the Haff.
Hi Glen,
Make sure you clean the surfaces on the crank case very well along with the surfaces of the rubber bungs on the oil return pipes as they are prone to leaking, especially if you haven't managed to torque the heads down correctly and then rechecked the torque settings after you have driven the Haf for a couple of hundred miles!
Better yet, use new rubber bungs every time you dismantle those pipes - Same as the push rod tubes!
JOhn
Haflinger 703AP LWB 1973 - (Once owned by Lady Sutherland & Sons.) Now called "Lurch" !
Have you hit the "DONATE" button at the bottom of the page after reading this post? Many thanks if you have!!
Have you hit the "DONATE" button at the bottom of the page after reading this post? Many thanks if you have!!
Re: Hemi the Haff.
Hi all, glacial progress at the moment due to new job,
However when cleaning up the manifold i found holes in the preheat pipes after a mild panic and enquires about getting my son to bent up new pipes and cut new flanged i can to my senses and chemical metaled the 2 holes - thats a job for the rebuild i think.
On the bright side I got the pulleys cleaned up and powder coated satin black I’ll get the tinware done when I rebuild it.
However some questions.. what is the red colour on the fan, anyone have the RAL number?
Also
Anyone know the torque setting for the flywheel and the front pulley nut?
Cheers all
However when cleaning up the manifold i found holes in the preheat pipes after a mild panic and enquires about getting my son to bent up new pipes and cut new flanged i can to my senses and chemical metaled the 2 holes - thats a job for the rebuild i think.
However some questions.. what is the red colour on the fan, anyone have the RAL number?
Also
Anyone know the torque setting for the flywheel and the front pulley nut?
Cheers all
Re: Hemi the Haff.
Flywheel nut 24x1.5 = 32 to 34 mkp (Mkp can be converted using an online measurement converter)
Looking at the Parts book - it lists 3 variations on the nut with pulley wheel. So, it depends on whether your engine has the auxillary gear (which I think means PTO) or not. Also having looked at the parts book it give 3 different part numbers, three different diameters - so, now I am guessing it has to do with the diameter of the puelly wheel you have on your nut!
53 diameter = 14mkp
85 diameter = ?
90 diameter = ?
Workshop manual says this nut is 12mkp
So take your pick!!
As far as the holes go in the Pre heat pipe, I would either silver solder them or braze them. I doubt JB WELD has the longer term heat / cooling expansion capability that the pipe gets subjected too.
There is a thread on here showing my repair for the same pipe, but my holes were right in the joint betweenthe two pipes where they join the carb mounting plate.The pipes are brazed in so if you can get the mounting plate hot enough you should be able to pull the pipe out.
Only problem with bending up your own new ones is getting them lined up correctly. Might be worth make a quick jig to match your existing 4 flanges and then you can put your new pipes on to the jig, fasten the flanges down with the 4 new pipes in the correct positions to be brazed in place.
John
Haflinger 703AP LWB 1973 - (Once owned by Lady Sutherland & Sons.) Now called "Lurch" !
Have you hit the "DONATE" button at the bottom of the page after reading this post? Many thanks if you have!!
Have you hit the "DONATE" button at the bottom of the page after reading this post? Many thanks if you have!!
Re: Hemi the Haff.
Thanks John, I going to have to buy you a beer when we next meet.
34mk.p = 300Nm jesus my Torque wrench only goes up to 250Nm - though my big rattle gun will do 350Nm so that s the ticket..!
flywheel on, clutch on, front pully on, tinware has been "adjusted" but need to remake the blanking plates for the back of the fan shroud.
The back piece of tinware around the flywheel needs to meet the hammer as the edges are badly bent and rotted so may cut them off and weld on some replacements.
Re: Hemi the Haff.
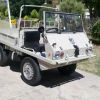
HI All, It's been a while a new Job, life and holidays have got in the way of doing anything constructive with Hemi, however I've now started to strip the platform ready to clean it up prior to repainting, there are a few areas that require attention and I want to change the colour from Fergie grey to an original colour, I would be nice to obtain the build sheet to find the original colour but I've settled on pebble grey for the moment.
I have some patching to do on the tool boxes :
I managed to warm up the bottom and push out the dents just have to patch the bottom but this will be one of the last jobs, the same with the other toolboxes, I also have to get a look at the battery slider I have bought a new tray but will need to see how it attached to the battery box.
One thing I did get done was some canvas sleeves for the door chains, I was at a Land rover show earlier in the year and a company was selling offcuts of the hood material, I got a local upholster to make me some sleeves:
I think I'll get version 2 made with the seam inside.
I had the jerry can lying around and decided to try the colour out, I also had the battery tray powder coated at the same time, I will probably have the toolboxes, fuel tank roll bar etc powder coated rather than painted :
I have some patching to do on the tool boxes :
One thing I did get done was some canvas sleeves for the door chains, I was at a Land rover show earlier in the year and a company was selling offcuts of the hood material, I got a local upholster to make me some sleeves:
I had the jerry can lying around and decided to try the colour out, I also had the battery tray powder coated at the same time, I will probably have the toolboxes, fuel tank roll bar etc powder coated rather than painted :
Re: Hemi the Haff.
One step at a time works. Just remember to actually take the steps! It's very easy to put off doing something and then it does not get done. As far as I know the battery tray just slides in on the bottom of the battery tray and is held down by two "L" shaped arms which it slides under.
Getting the build sheet is expensive, but you can get it either direct from the company who now have the rights or via HaflingerTechnik.
John
Getting the build sheet is expensive, but you can get it either direct from the company who now have the rights or via HaflingerTechnik.
John
Haflinger 703AP LWB 1973 - (Once owned by Lady Sutherland & Sons.) Now called "Lurch" !
Have you hit the "DONATE" button at the bottom of the page after reading this post? Many thanks if you have!!
Have you hit the "DONATE" button at the bottom of the page after reading this post? Many thanks if you have!!
Re: Hemi the Haff.
Don't know if anyone on here is interested, but i have a large batch of powder coating powder made to paint code 2660 6-066 (Cactus green 3020 G10Y) which i think is very close to the old reseda green original colour. There's loads left over as it only took a few Kgs to coat everything including the platform and I had to get 40Kgs mixed up as a minimum batch.
See photo for approx. colour under harsh LED lights
It's a shame to just have it sitting on a shelf and there's more than i will ever need so if anyone is interested in a quantity then let me know.
See photo for approx. colour under harsh LED lights
It's a shame to just have it sitting on a shelf and there's more than i will ever need so if anyone is interested in a quantity then let me know.