"If it's got tits or wheels it's going to cost" - A truism if ever there was one.
Hemi the Haff.
Re: Hemi the Haff.
I was going to say I own a land rover, a triumph motorbike and the Haf so weekly greasy bits bills are nothing new, however the truth is they own me. 
"If it's got tits or wheels it's going to cost" - A truism if ever there was one.
"If it's got tits or wheels it's going to cost" - A truism if ever there was one.
Re: Hemi the Haff.
Hi chaps, I've not made much progress due to work and holidays but managed to have a fiddle and clean up the Carb - its come up a treat apart from the pump rod I broke and the 2 screws from the top cover that have magically disappeared.
It seems the base is made of either brass or bronze.
I
It seems the base is made of either brass or bronze.
I
- Attachments
-
-
-
Re: Hemi the Haff.
While I was waiting for some parts for the Carb I decided to tackle the rest of the accelerator linkage as I had already snapped the ball joint on the long control rod from the accelerator pedal and the whole assembly had loads of play and was generally worn.
I decided to make a new rod from 6mm Stainless steel as the original 6mm mild steel rod was badly pockmarked and bent.
Looking back I should have stuck to mild steel as it was a sod of a job trying to drill a 2mm hole in the front for the split pin, after snapping 3 cobalt drill bits I tapped it and put a nut on it.!
After checking the parts manual I noticed the accelerator peddle link rod seemed to be missing one of the top hat bushings so I started to strip the peddle and rod, after knocking through the roll pins holding them together- it's surprising how much "ticking" with an ever larger hammer it takes to shift the pins that have been over painted many times, I then found the rod would come through the body only about 75mm after much swearing it popped out with much joy on my part followed by curses.
The rod finally released after I gave it a mighty smote with a 2lb ballpein, the rod shot out hit a brick wall and ricochet back into my shin.!
time to go in and have a beer.
The issue was one side of the rod had a well worn plastic top hat bush, the other end was packed up with insulation tape that had unwound and jammed the rod.
Eventually all bits were removed cleaned, the holes in the levers have been welded up and re-drilled where necessary and painted black, I'm just waiting on new bushes to reassemble it.
I decided to make a new rod from 6mm Stainless steel as the original 6mm mild steel rod was badly pockmarked and bent.
Looking back I should have stuck to mild steel as it was a sod of a job trying to drill a 2mm hole in the front for the split pin, after snapping 3 cobalt drill bits I tapped it and put a nut on it.!
The rod finally released after I gave it a mighty smote with a 2lb ballpein, the rod shot out hit a brick wall and ricochet back into my shin.!
time to go in and have a beer.
The issue was one side of the rod had a well worn plastic top hat bush, the other end was packed up with insulation tape that had unwound and jammed the rod.
Eventually all bits were removed cleaned, the holes in the levers have been welded up and re-drilled where necessary and painted black, I'm just waiting on new bushes to reassemble it.
- Attachments
-

Re: Hemi the Haff.
Sounds like you hit a typical '70's repair! Or was it an '80's repair? Either way, there was a period when "original" spares were difficult to come by so many Haf's, if they survived, had "make do and mend" repairs. Lurch had a fair number of them when I aquired him. Most obvious ones currently, are the bottoms of the pop up seat foot wells.
Haven't quite worked out how to repair them properly yet. My welding upside down and in a contorted shape is never going to be very good!!
Get you Haf back together and start driving it! That will show up all the things you still need to fix!
John
Haven't quite worked out how to repair them properly yet. My welding upside down and in a contorted shape is never going to be very good!!
Get you Haf back together and start driving it! That will show up all the things you still need to fix!
John
Haflinger 703AP LWB 1973 - (Once owned by Lady Sutherland & Sons.) Now called "Lurch" !
Have you hit the "DONATE" button at the bottom of the page after reading this post? Many thanks if you have!!
Have you hit the "DONATE" button at the bottom of the page after reading this post? Many thanks if you have!!
Re: Hemi the Haff.
I know I think I'm subconsciously finding smaller jobs to do while avoiding lifting the platform to get at the shift turret to fix the sloppy linkage and lack of reverse.
The weather is perfect for hooning about in a topless haf at the moment also.
The weather is perfect for hooning about in a topless haf at the moment also.
Re: Hemi the Haff.
C'est plus façile quand tout est démonté.heinkeljb wrote: ↑Tue Sep 20, 2022 9:25 pm Sounds like you hit a typical '70's repair! Or was it an '80's repair? Either way, there was a period when "original" spares were difficult to come by so many Haf's, if they survived, had "make do and mend" repairs. Lurch had a fair number of them when I aquired him. Most obvious ones currently, are the bottoms of the pop up seat foot wells.
Haven't quite worked out how to repair them properly yet. My welding upside down and in a contorted shape is never going to be very good!!
Get you Haf back together and start driving it! That will show up all the things you still need to fix!
John
Re: Hemi the Haff.
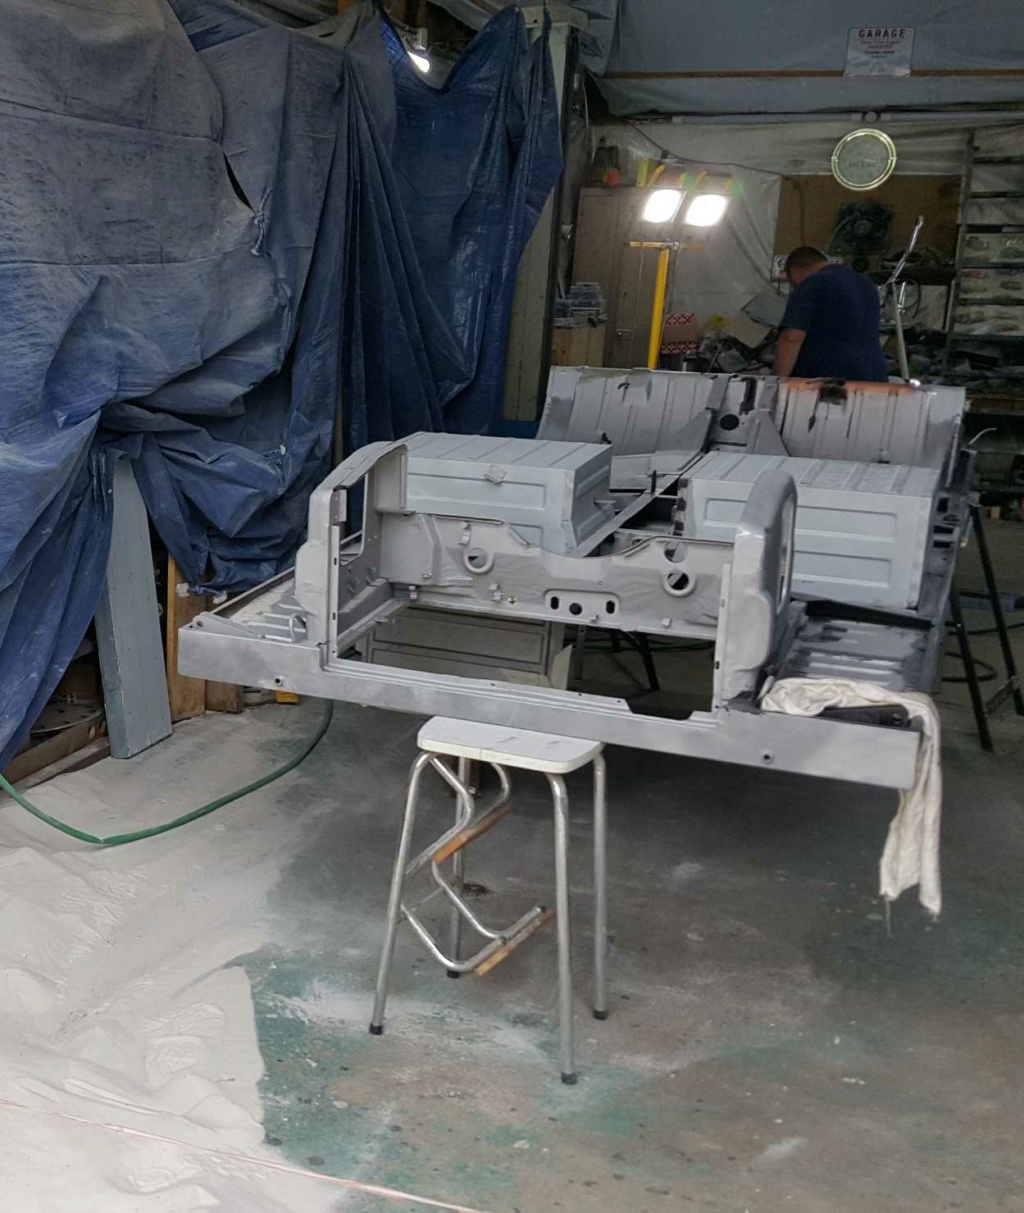
I agree, but some people do not have the space to take their Haflinger completely apart. I read somewhere that when you tak e avehicle apart it takes up 3 times as much space as when it it togther.
Also I can't - (Don't want to) take Lurch apart as I have no garage to work in. so everything would be outside apart from small stuff. I don't think my neighbours would be too happy with me putting up a big gazeebo on the drive for months on end whilst I did repairs...!
John
Also I can't - (Don't want to) take Lurch apart as I have no garage to work in. so everything would be outside apart from small stuff. I don't think my neighbours would be too happy with me putting up a big gazeebo on the drive for months on end whilst I did repairs...!
John
Haflinger 703AP LWB 1973 - (Once owned by Lady Sutherland & Sons.) Now called "Lurch" !
Have you hit the "DONATE" button at the bottom of the page after reading this post? Many thanks if you have!!
Have you hit the "DONATE" button at the bottom of the page after reading this post? Many thanks if you have!!
-
AustHaflinger
- Posts: 2472
- Joined: Sun Jan 06, 2013 1:27 am
- Location: Canberra Australia
Re: Hemi the Haff.
In my experience with a few cars now, unless you can guarantee day to day dedication to the task do not strip a vehicle down - do running repairs etc as required - if motivation is lost you only have to fix one or two little things and get out for some enjoyment - for most people not a lot of enjoyment looking at a pile of parts on the floor that will take weeks/months/years to get back on the road.
Haflinger 700AP (73)
Range Rover Sport TDV6 (07)
Landrover FC 101 (77)
Landrover Series 1 SWB Station Wagon (57)
Landrover Series 1 SWB (57)
Jaguar E-type Roadster V12 (71)
Jaguar XJ12C (76)
Range Rover Sport TDV6 (07)
Landrover FC 101 (77)
Landrover Series 1 SWB Station Wagon (57)
Landrover Series 1 SWB (57)
Jaguar E-type Roadster V12 (71)
Jaguar XJ12C (76)
Re: Hemi the Haff.
I'd love to strip it over the coming winter, however I want to start with a vehicle that is running and driving so I know about any issues before I start separating the tube and running gear from the platform, although I'll probably get it running and run around it it as is, I'm not one for polish I like things to be mechanically sweet as they can be but don't really care what they look like.
If I get around to it this year I'll probably separate the platform and tube and work on it as two "modules" I'll put one in a storage container and work on the other part in the garage.
This is not my 1st rebuild I've done a number of landy's and VW's, My current land rover 90 I did a nut and bolt rebuild from scratch on the drive and in the same garage, the only thing that was not taken to the component parts and rebuilt was the auto gearbox.
Although this is my 1st haf and the smallest thing I've tackled so far, but as they say " The only way to eat an Elephant is one bite at a time. - even a baby elephant.!"
PS I am looking for a larger garage/workshop
Re: Hemi the Haff.
Slow progress...
Carb is refurbished and back on, and Hemi is running again albeit badly, anyone have a starting point for the slow running screws? - the manual is a little sparse on the details.
On the bright side I've fitted a new higher output viper resin filled coil, I got it from a chap at a landrover auto jumble, turns out he sold all types of ignition components, during our chat I noticed he had a pertronix electronic ignition set and asked if he had a kit fit the Haf.
Turns out he sells all the parts to make a hall effect set, so after a chat he gave me a brand new Bosch dizzy to compare with the Haf unit and I'm in the process of making a bespoke hall effect replacement for the points and condenser.
I'm waiting for a 2 pole replacement for the rotor arm and trying to get the base plate fitting nice in the dizzy - it helps having a son with a laser to cut out parts FOC
Nice to have something to drag me away from the Telly ..... if only the garage was bigger
-
AustHaflinger
- Posts: 2472
- Joined: Sun Jan 06, 2013 1:27 am
- Location: Canberra Australia
Re: Hemi the Haff.
I find this procedure in the user manual works well.
Haflinger 700AP (73)
Range Rover Sport TDV6 (07)
Landrover FC 101 (77)
Landrover Series 1 SWB Station Wagon (57)
Landrover Series 1 SWB (57)
Jaguar E-type Roadster V12 (71)
Jaguar XJ12C (76)
Range Rover Sport TDV6 (07)
Landrover FC 101 (77)
Landrover Series 1 SWB Station Wagon (57)
Landrover Series 1 SWB (57)
Jaguar E-type Roadster V12 (71)
Jaguar XJ12C (76)
Re: Hemi the Haff.
Perfect.
Thank you Garry.
I don't have that in my workshop manual.
Thank you Garry.
I don't have that in my workshop manual.
Re: Hemi the Haff.
That's because it is not in the workshop manual but in the USERS manual, which is a little handbook tells you what all the switches are, how to drive a Haflinger, how to dismantle and lubricate the front repiza (CV) joints etc. Basically, what they forgot to put in the workshop manual!
John
John
Haflinger 703AP LWB 1973 - (Once owned by Lady Sutherland & Sons.) Now called "Lurch" !
Have you hit the "DONATE" button at the bottom of the page after reading this post? Many thanks if you have!!
Have you hit the "DONATE" button at the bottom of the page after reading this post? Many thanks if you have!!
-
AustHaflinger
- Posts: 2472
- Joined: Sun Jan 06, 2013 1:27 am
- Location: Canberra Australia
Re: Hemi the Haff.
Yes as John indicated - for day to day use the handbook is more useful.
See manual attached
See manual attached
Haflinger 700AP (73)
Range Rover Sport TDV6 (07)
Landrover FC 101 (77)
Landrover Series 1 SWB Station Wagon (57)
Landrover Series 1 SWB (57)
Jaguar E-type Roadster V12 (71)
Jaguar XJ12C (76)
Range Rover Sport TDV6 (07)
Landrover FC 101 (77)
Landrover Series 1 SWB Station Wagon (57)
Landrover Series 1 SWB (57)
Jaguar E-type Roadster V12 (71)
Jaguar XJ12C (76)
Re: Hemi the Haff.
Perfect Thank you Garry.
Birth Certificate & vin tags
Hi Chaps, hope you all made merry over the holiday period and 2023 brings you all what you deserve.
Hemi is running sweet now many thanks for the helpful comments, next job is to reliably find reverse... and in the longer term make electronic replacements for the points.
However while navel gazing in the garage I've decided to make an overlay for the new vin plate that will allow me to stamp the vin numbers with the correct spacings and in line, and this in turn got me thinking if there was such a thing as the "birth certificate".
I don't know if there were records kept of the manufacturing date and to where the vehicle was delivered when it left the factory or if there is some sort of registry where I could obtain a copy.
cheers
Hemi is running sweet now many thanks for the helpful comments, next job is to reliably find reverse...
However while navel gazing in the garage I've decided to make an overlay for the new vin plate that will allow me to stamp the vin numbers with the correct spacings and in line, and this in turn got me thinking if there was such a thing as the "birth certificate".
I don't know if there were records kept of the manufacturing date and to where the vehicle was delivered when it left the factory or if there is some sort of registry where I could obtain a copy.
cheers
-
ogdenenterprise
- Posts: 433
- Joined: Sun Jan 06, 2013 7:40 am
- Location: Cairns , Australia
Re: Hemi the Haff.
Hi,
Give Dale a call at HaflingerTechnik, he can get a copy for you.
You will need the engine, gearbox numbers and any other relevant information.
They are quiet expensive, I think I paid 100 pounds for a copy a few years ago
Dave
Give Dale a call at HaflingerTechnik, he can get a copy for you.
You will need the engine, gearbox numbers and any other relevant information.
They are quiet expensive, I think I paid 100 pounds for a copy a few years ago
Dave
Re: Hemi the Haff.
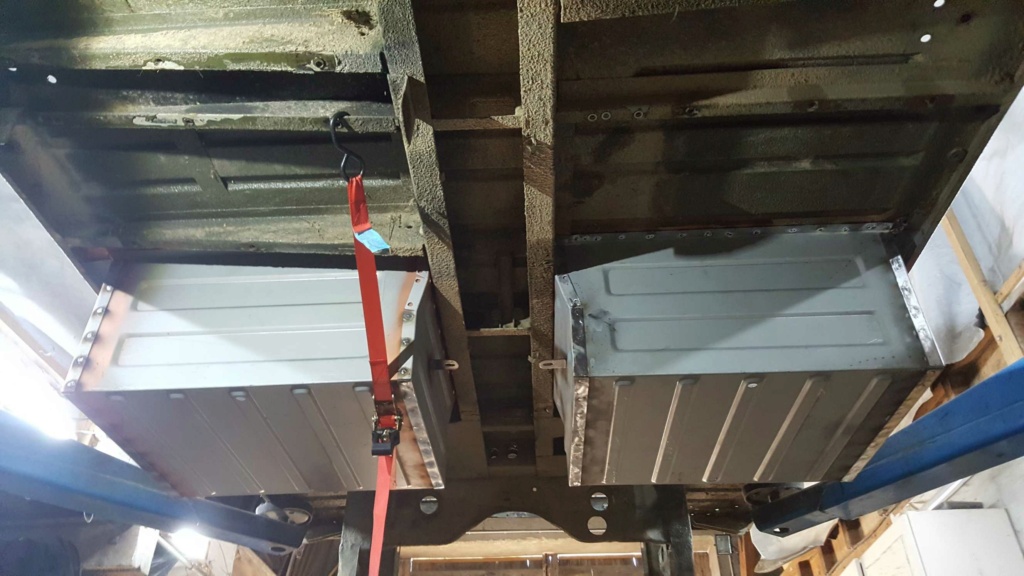
Hi Chaps, not much progress Hemi is running sweet with instant start - possibly not a good thing, as I found out on the weekend.
I've been trying to get reverse gear and failing.!
There seems to be a lot of play in the linkage inside the tower, while I was under the Haf twiddling the shift rod adding/removing shims etc I had my glamorous assistant try to engage reverse, unfortunately "try that" means start the car in wifeish resulting in the Haf bursting to life and driving up my shoulder onto my chest. "dip the Fu****g clutch" means turn the engine off apparently, with it still on my chest. luckily it was not my head near the wheel.!
So with that in mind I decided to fiddle with the Difflock levers to calm down and forget what almost happened.
Before:
After:
Can you obtain new coloured sleeves for the levers,? I need to fill the missing piece in the lever and use heatshrink tubing to cover them otherwise.
Cheers..
I've been trying to get reverse gear and failing.!
There seems to be a lot of play in the linkage inside the tower, while I was under the Haf twiddling the shift rod adding/removing shims etc I had my glamorous assistant try to engage reverse, unfortunately "try that" means start the car in wifeish resulting in the Haf bursting to life and driving up my shoulder onto my chest. "dip the Fu****g clutch" means turn the engine off apparently, with it still on my chest. luckily it was not my head near the wheel.!
So with that in mind I decided to fiddle with the Difflock levers to calm down and forget what almost happened.
Before:
Can you obtain new coloured sleeves for the levers,? I need to fill the missing piece in the lever and use heatshrink tubing to cover them otherwise.
Cheers..
Re: Hemi the Haff.
Hi Glen,
I am glad to hear you are all right after being run over! No a pleasnt experience I would have thought! Any way to get on the more pleasent parts of your post.
You could try using Heat shrink tubing, but I think you will end up with little ridges under the curves of the arms. The other stuff to try would be "Plastidip" paint - basically plastic paint. Several coats would probably do the trick.
John
Haflinger 703AP LWB 1973 - (Once owned by Lady Sutherland & Sons.) Now called "Lurch" !
Have you hit the "DONATE" button at the bottom of the page after reading this post? Many thanks if you have!!
Have you hit the "DONATE" button at the bottom of the page after reading this post? Many thanks if you have!!
Re: Hemi the Haff.
HI Chaps It's been a while,
However I have now sorted out the gear linkage and I have a reliable reverse.. Huzzzah..! it took me F@*!!ing ages though. and included highlights of being run over by my wife while I was lying underneath and her stopping with the left rear tyre on my chest.!!
The trick was elongating the holes slightly (thanks James.) using a bungy to hold the gear leaver in place(thanks Ogdenenterprise) - I didn't trust my wife to do this again.!
manually engaging reverse and with the 3 bolts on the linkage flanges nipped up I rotated the gearbox end to the left and tightened up the bolts and bingo.. reverse.!
Not only that the rest of the gears are not so much nicer in the selection.
As I've spent so much time under Hemi I noticed the fuel tank drain plug had constant drip so time to change the copper washer, I had run out of fuel anyway so an ideal time to do it, however on removing the drain plug I found this...
Damit the threads are mushed so I'll need to get a new drain plug but I've annealed the washer and refitted it, thankfully no drips yet but something else to play on my mind.
after running out of fuel I thought I would be a nice idea to know how much fuel is in the tank so using the measurements from someone here - Many thanks I cant find the post to credit you, but thanks all the same I had my son cut a dipstick on the laser
That's it for now, awaiting delivery of some plastidip for the difflock levers as suggested by John, I tried heat shrink tubing but it looked crap.. so on to the next thing.
However I have now sorted out the gear linkage and I have a reliable reverse.. Huzzzah..! it took me F@*!!ing ages though. and included highlights of being run over by my wife while I was lying underneath and her stopping with the left rear tyre on my chest.!!
The trick was elongating the holes slightly (thanks James.) using a bungy to hold the gear leaver in place(thanks Ogdenenterprise) - I didn't trust my wife to do this again.!
manually engaging reverse and with the 3 bolts on the linkage flanges nipped up I rotated the gearbox end to the left and tightened up the bolts and bingo.. reverse.!
Not only that the rest of the gears are not so much nicer in the selection.
As I've spent so much time under Hemi I noticed the fuel tank drain plug had constant drip so time to change the copper washer, I had run out of fuel anyway so an ideal time to do it, however on removing the drain plug I found this...
after running out of fuel I thought I would be a nice idea to know how much fuel is in the tank so using the measurements from someone here - Many thanks I cant find the post to credit you, but thanks all the same I had my son cut a dipstick on the laser